Thursday, August 29, 2013

A Baby Shower Gift.


My nephew and his wife are expecting their first baby. I think babies are just awesome and should be celebrated. I saw this great basket over at Noodlehead some time back and I just knew I had to make it. So, when I found out someone in the family was having a baby I jumped on that pattern! 

Here is the completed basket full of baby goodies! It just about killed me to wait to find out the colors they were using for the nursery. I wanted to buy fabric and get started the day I found out! I did wait though. Everyone likes different colors and has different 'styles' and I wanted the gift to be something that they would enjoy and use.

Fabric

The expecting couple finally
 registered and they indicated that the nursery was going to be done in orange, green, and light beige. They had some small dark brown items on the registery so I used that info and hit the local fabric stores and quilting shops. It was like I hit a brick wall. Everything I could find in those colors was ugly, or floral (not great for a boy), or had other colors mixed in. I usually like to buy local if I can but I had to shop online for the fabric this time. Someone had recently given me the link to a great online fabric store and I hit the jackpot there!


Basket
I started the project with the actual basket. The Noodlehead pattern was super easy to follow and it turned out beautifully. I also bought a pattern for a bag from them that I can't wait to make!


I picked the dark brown...called Rings in Brown by Dear Stella for the outside and a fun pop of orange...called Sweet Zig Zag in Orange by Lori Whitlock  for the inside. The trim is Rings in Cream by Mankower UK. After some digging I found out that the nursery was painted in the green, so I wanted this to compliment and not blend in. I also had in the back of my mind that it could be used out in the livingroom; possibly stuffed with some diapers, wipes, and extra burp cloths.


Swaddler
 Next up a made a fleece lined swaddler. Gail from over at Probably Actually has made a couple and they are just perfect! For the swaddler I went with Kulla in Orange by Lotta Jansdotter on the outside and some thin Malden Mills fleece (I bought this in bulk 6 years ago when I was on the cloth diaper making kick...I have something like 100 yards of it still) on the inside.


Crib Sheets
 I also made crib sheets in a nice soft flannel. The crib sheets in the store are all the same and all boring. I made these from an online tutorial I came across here. The fabric is Typewriter Text in Pistachio by Robert Kaufman


 Burp Cloths

For these, I just hit up my local cloth diaper store and bought the super absorbent Unbleached Indian Prefold diapers. I gave them a wash and dry to quilt them up a bit, then I added a simple binding on the ends. Super easy and cute! I have seen others that put the 'fun' fabric as a strip up the middle of the diaper but they are sooo good at absorbing and cleaning up spit up as is, I didn't want to mess with a good thing. If they were telling the baby's name I might have embroidered that down in the corner. For these I used the same brown rings fabric from in the basket, as well as the green flannel that was used in the sheets. I also used Squared Elements in Orange and Jungle Animals in Orange by Allison Cole.


Wash Cloths

For the wash cloths I used a microterry that I have had for some time (also from the cloth diaper making stint). For 3 of them I completely backed the wash cloth with some of the fabric. Then for the others I surged the edges of the microterry and then added a decorative strip...making sure to include all the fabrics from the project. I had to tie it all in some how!

Clothes
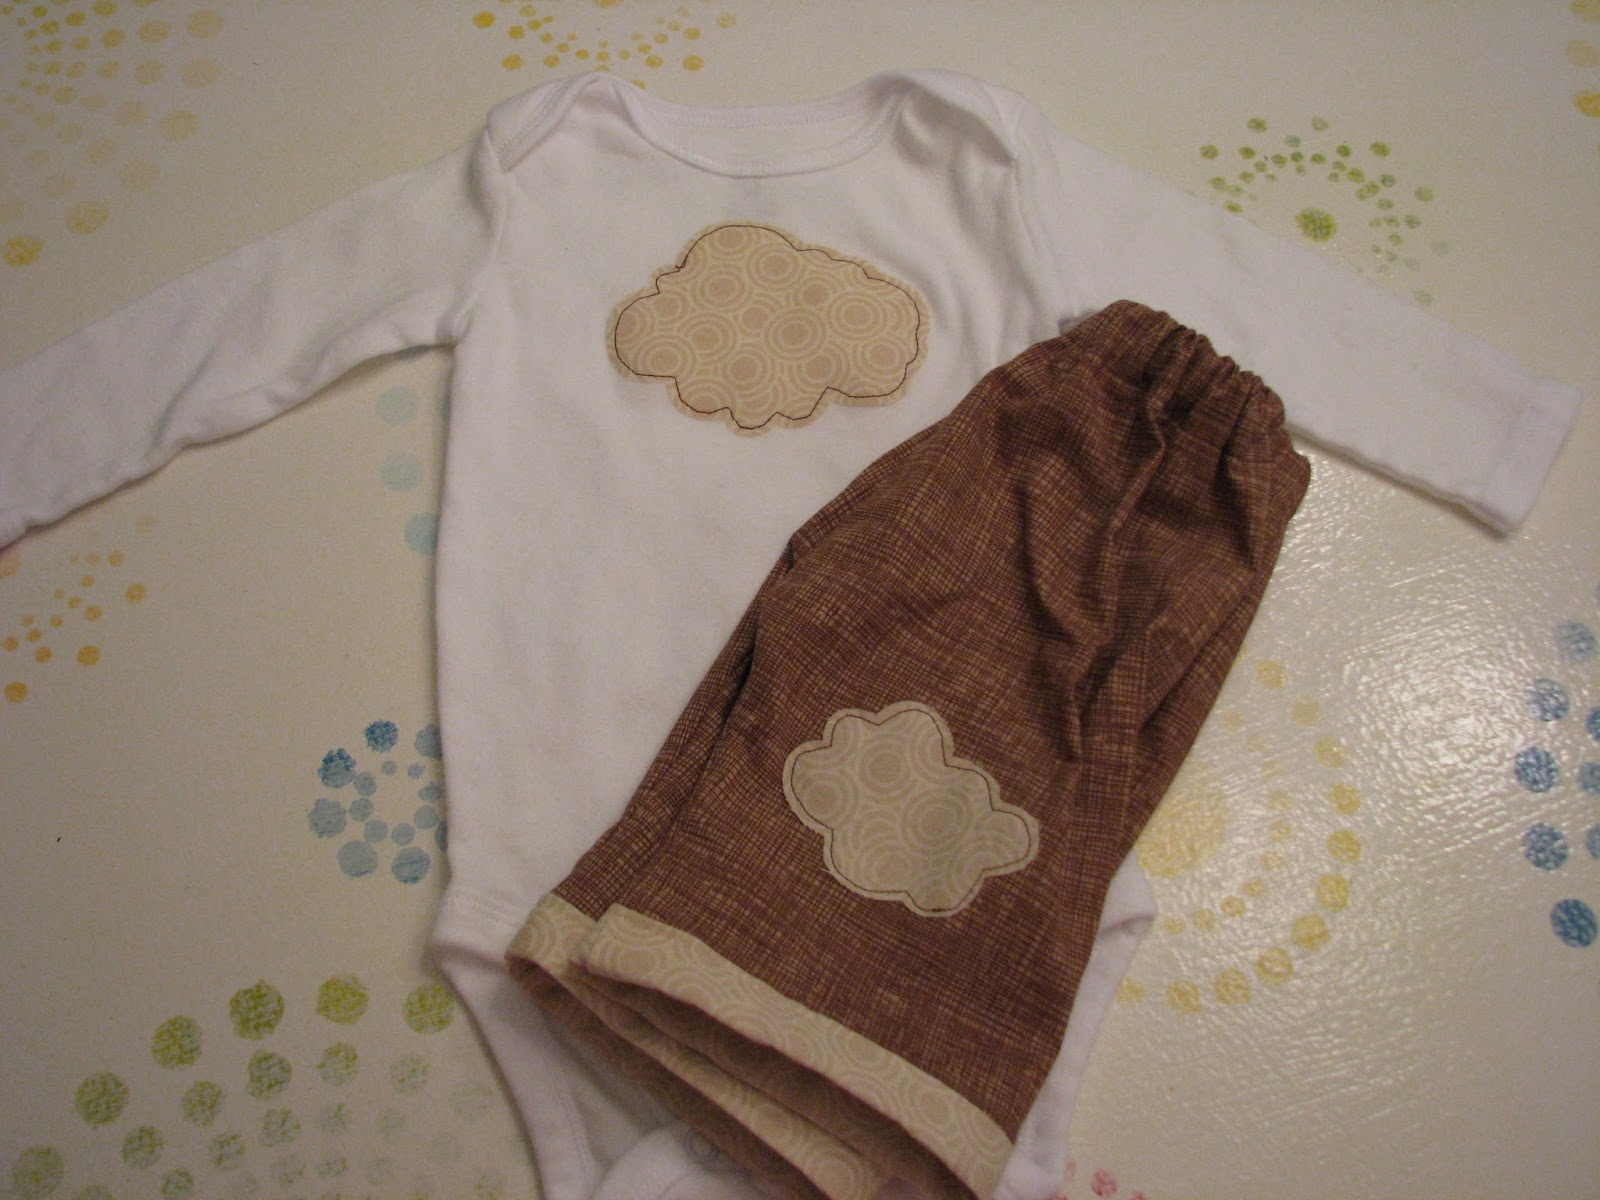
Finally, I appliqued some onsies with fun stuffs! I did a bow tie with the Squared Elements in Orange. Then I did a regular tie with a scrap from my huge pile of scraps. Then on the last onsie I did a cloud. The cloud was to match the pants I made. The pattern for the pants was a free one from Made-by-Rae. They were super easy to make and just completely adorable! The main fabric for the pants was Crosshatch Sketch in Caramel by Timeless Treasures.


Baby Shower Gift

Here is everything all ready to be stuffed in the basket. I also tossed in some baby body/hair wash, the best diaper cream that I have come across after 3 kids, and some bamboo nursing pads.

I had so much fun putting this together. It was a good 3 weeks of sewing every time I could stick the boys in front of their video games every moment the kids would let me sit down. Lots of sewing until late in the night after the kids were all in bed as well. Now I can't wait for someone else to have a baby so I can put together another one!


Tuesday, August 20, 2013

The Ice Cream Dress

 This was my first go at an Oliver + S pattern...well a paid for one anyway. I am very fond of the Lazy Days Skirt, free pattern on their site. 

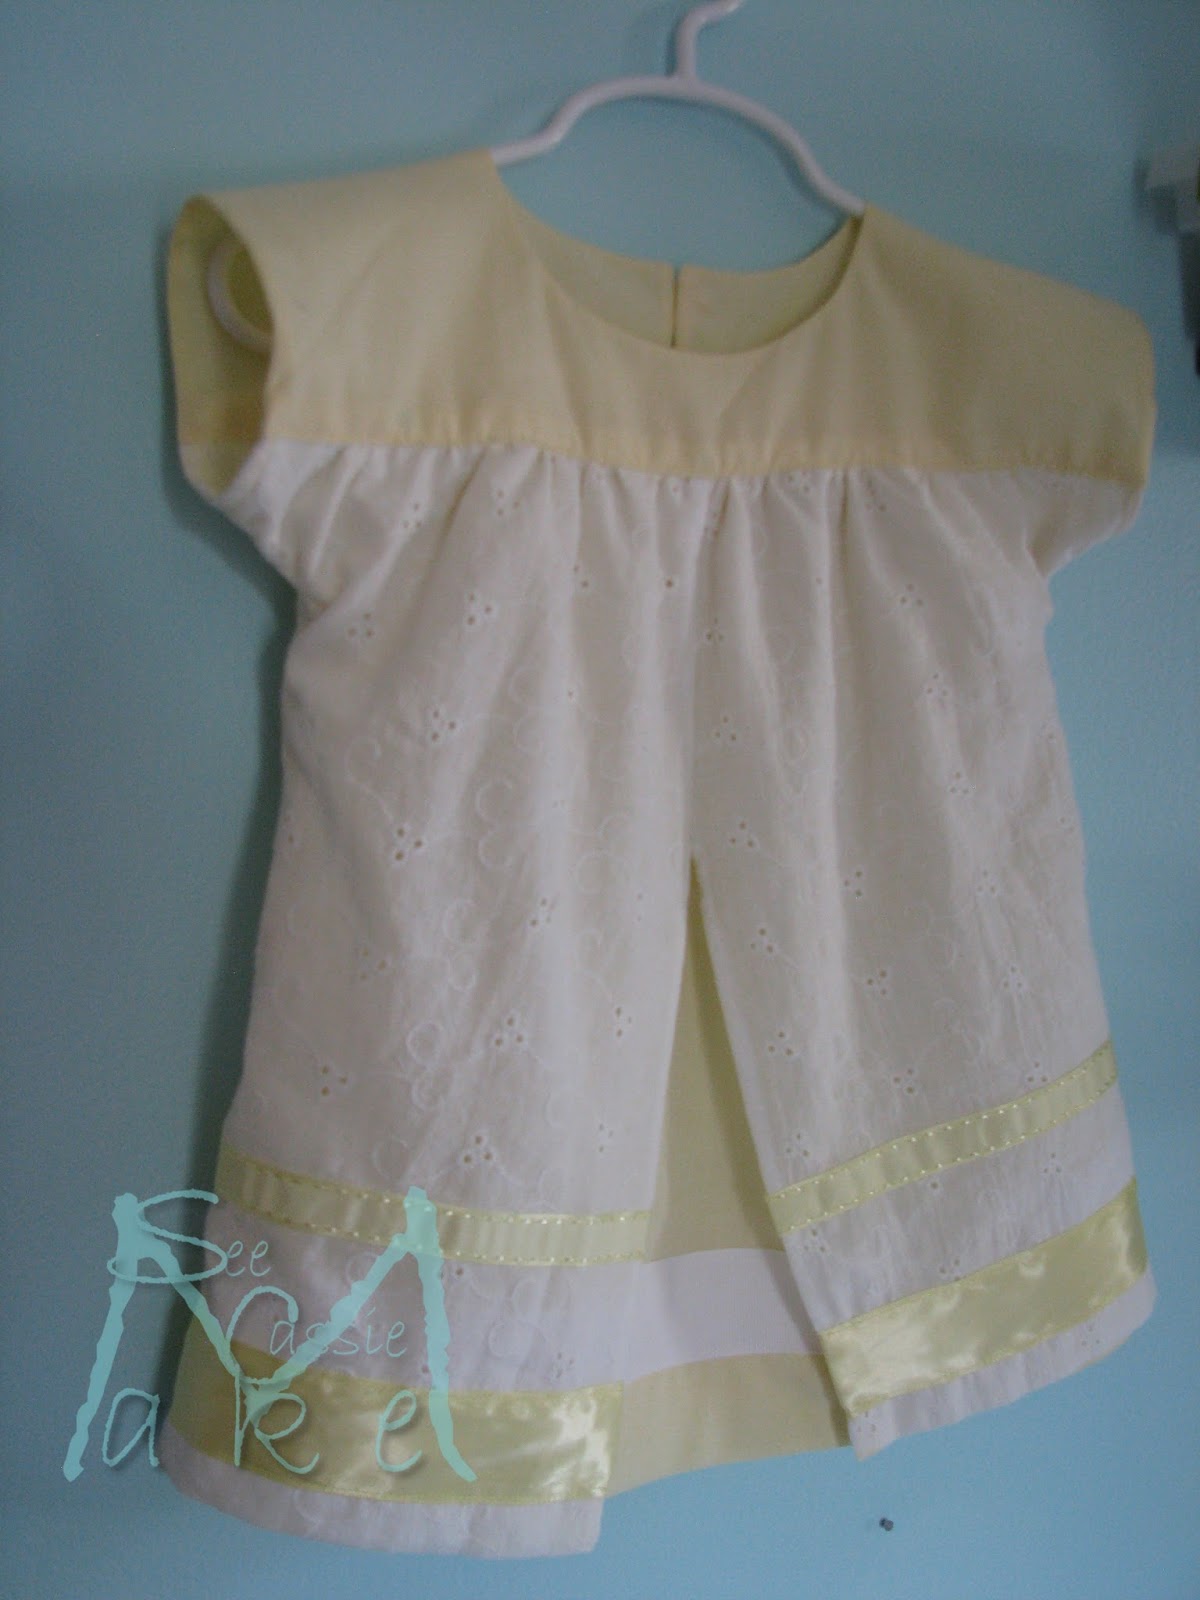
My niece is getting married so Miss Faye needed a party dress. I already had the material...a pale yellow broadcloth from Hobby Lobby and a pair of white eyelet pajama pants from the back of my drawer; they just never fit quite right....so I was on the lookout for a pattern. Gail from over at Probably Actually just made another Ice Cream top and I knew that the dress version would be perfect for what I had in mind.

The pattern was easy to follow. They give great tip for making each step a bit easier. Overall, I'm totally in love with the dress I made! I made the 12-18 month size which turned out to be way too long...but fit great everywhere else. I kept all the extra material and just folded it into the hem. This way, as long as the head and sleeves still fit; I have 4 inches I can let the dress out at the bottom. I also modified the dress as well. I wanted the eyelet as an overlay and the pattern called for color blocking. The color blocking just was not what I had in mind for a party dress. I also didn't add the pockets or the 'v' notch that should have been on the collar. I also added some ribbon on the bottom to sort of mimic the color blocking.

Here is the completed dress (well, maybe not...I think I want to add something up near the top).
  
I created the split by folding the eyelet in half after I already cut out the pattern piece. I marked in 2.5 inches (knowing that would double when I unfolded the dress) and around 12 inches up. I cut out the 'V' shape that I had created and then I unfolded the dress and continued cutting the front piece in half. I put in a 1/4" hem going down each side and then I used my surger to sew the two halves back together.

I made the main part of the dress out of a pale yellow material that I picked up at Hobby Lobby. It was one of those purchases just because I loved the color. It was also only a $2 purchase...I mean, how could you pass something like that up! I just knew I would find a reason to use it.
I also picked out a fun button with the help of Miss Faye's big brothers.
She looks adorable in the dress! As you can see, I added white ribbon on the yellow fabric and yellow ribbon on the eyelet. I choose three different ribbons to add some visual interest.
And someday my 11 month old will get some hair!
ETA....I did add some daisies! This dress is just perfect!


Tuesday, July 30, 2013

A Name for the Nursery.

I have been CRAZY busy with projects here. Too busy to sit and type up posts and some things I have been making are gifts and I can't share until the gifts have been given. So, here is a quick recap of a 10 month/10 minute project.

I took 10 months to get around to the project and then it only took me 10 minutes.

For each of my children I have purchased and decorated wooden letters spelling out their name. For my boys I had this done before they even arrived. For Miss Faye I'm just getting around to it. First, we took FOREVER picking her name out while I was pregnant. Then, she choose to come 3 weeks early...and well, 10 months and 10 minutes later.......

  Instead of painting the letters like I did for the boys, I used scrapbook paper and mod podge for Miss Faye's name. I pulled the main colors from her room and did each letter a different color. I also made a point to choose different "textures" to supply some visual interest.

Except for the spacing being off (too much space between the A and the Y), I love it!

Saturday, July 6, 2013

The Harper Reversible Dress

I really have a thing for Sew Sweet Patterns. They have so many cute patterns out there! I made The Harper Reversible Dress and not only is it cute but it was super easy to make as well. I found this fabric at Jo Anne Fabrics (I really need to start paying attention to the designers for the fabrics). It is a soft cream background with the blue birds and yellow and blue flowers. I am just loving bird fabrics lately.

I love the pleats at the top, and then the classic A-Line silhouette is just perfect for a little girl. The sizing was perfect for this dress though. I was a bit upset that the directions said to get 1/2 yard of each fabric and that was not enough. When I went to cut out the pattern, the fabric was a good 3 inches too short and I needed to make another trip to the fabric store.
 
 For the reverse side I found a subtle yellow tone plaid.


 The best part....the model! It is soooo hard to get a clear shot of her. She is a mover and a shaker and this was the best I could do.
 And the back.

The Sabrina Dress

Here is the Sabrina Dress from Sew Sweet Patterns I love the material that I picked for the dress but I'm not completely satisfied with the fit. I made the 6 to 9 month size (Miss Faye was 9 months in these pictures) and it is HUGE on her (around, not in length). Usually, she is true to size...she is right below the 50th %. I love the dress though, so I will make it again with some alterations to the pattern first. I like how there is a button and loop in the back...I think I will just add another one to stop the gaping. I also like how the bodice is lined. I also like that I will just be able to add another "tier" to the skirt to make it longer. She will be able to wear this dress for a good couple of years (without having to make another one).

Here she is standing up. You can see how HUGE it is. The neck is just way too big and the dress falls off one shoulder all the time.  I may be able to add a pleat in the front to help with that. Maybe take the sides in a couple of inches as well. I followed the pattern exactly...the other patterns from Sew Sweet Patterns have fit beautifully. I'm quite disappointed that this one is just so 'off'.

Friday, July 5, 2013

A Little Firecracker!


Now that the festivities from the 4th of July are over I have a few minutes to sit down, think, and get a post up! Miss Faye celebrated the 4th in style of course. I picked up this great red and white fabric back in May. I love it and I knew right away that I would use it for 'something' for the 4th of July. I also still have about a 1/4 yard left for the future! I do not know the specifics for it though. I picked it up from Jo Anne Fabrics.


Throw in some blue....just a tiny bit at the waist and a 2.5 inch hem with some white top stitching....


....and Miss Faye becomes my Little Firecracker!
Here is an action shot. We were waiting for it to get dark enough for fireworks.

All three kids!

Monday, July 1, 2013

A Farm Share Sausage Soup

This summer we decided to get a share from a local farm; Troggs Hollow. It was a way to insure fresh veggies all summer. So far we have only had two weeks worth and being so early in the season it has been almost all greens. 

I have a sausage potato soup that I have been making for quite a few years now and I decided to spruce it up a bit with our veggie share. I use a smoked sausage in it but ham or bacon would be just as good. For this batch I used hakurei turnips, and dinosaur kale. I usually have homemade chicken/turkey stock but I'm out and need to make a fresh batch so I had to use some store bought this time. I also added 5 red potatoes. Onion is also good in this but I didn't have any this time.
Ingredients for Soup Including Fresh Hakurei Turnips and Dinosaur Kale


I start out by browning the sausage. Then, I cubed the turnips and potatoes and ripped the veins out of the kale. Since all parts of the turnips are edible I also coarsely chopped up the turnip greens.I add in the stock and make sure to scrape all the yummy bits up from the bottom of the pot. Next, I add in the potatoes and turnips. I add my seasoning at this point as well. I use thyme (fresh is best but I had to use dried this time), parsley, red pepper for a kick, and some black pepper. If salt is needed add it at the end. If you add it at this point it gets absorbed by the potatoes. I bring the pot to a boil then lower the heat to a simmer. Keep the simmer going for about 20 - 25 minutes or until the potatoes and turnips are fork tender. During the last 5 minutes of simmering time I added the kale to a separate skillet with some bacon drippings (you can use butter but Owen has dairy issues so I try to not use it here). I cook it for around 2-3 minutes and then add it to the pot of soup at the end. I pull out a serving for Owen (keeping it dairy free for him) then I add about a 1/4 c. of heavy cream. I bring it back up to a simmer but only for about 5 minutes (don't let it get back up to a rolling boil or the cream will separate).

  Serve as is and enjoy or top with some shredded cheese to melt in. This soup went over so well in our house that every last drop was eaten...none for left-overs! That is saying something since Hugh is such a picky eater.